

25 most common questions asked in a iOS developer job interview
An iOS developer is a software developer who specializes in developing apps for the iOS operating system, which is used on Apple’s iPhone…


An iOS developer is a software developer who specializes in developing apps for the iOS operating system, which is used on Apple’s iPhone, iPad, and iPod Touch devices. iOS developers are responsible for designing, building, and maintaining iOS apps, and they work with a variety of tools and technologies, including the iOS SDK (Software Development Kit), Xcode, and Swift or Objective-C programming languages.
iOS developers typically have a strong understanding of computer science principles and a good understanding of user interface design principles. They also have experience with object-oriented programming and have a good understanding of the iOS operating system and its features and capabilities.
iOS developers may work on a wide range of app types, including games, productivity apps, social networking apps, and more. They may also work with a variety of frameworks and libraries, such as Core Data and Core Animation, to build robust and feature-rich apps.
Here are 25 common questions that may be asked in an iOS developer job interview:
1. Can you explain the MVC (Model-View-Controller) design pattern and how it is used in iOS development?
The Model-View-Controller (MVC) design pattern is a software design pattern that separates an application into three main components: the model, the view, and the controller. The MVC design pattern is widely used in iOS development to organize the structure of an app and to make it easier to develop, maintain, and test.
Here is a brief overview of each component in the MVC design pattern:
Model: The model is responsible for managing the data and logic of the app. It represents the underlying data and business logic of the app, and it is typically implemented as a set of classes that represent the data and behavior of the app.
View: The view is responsible for displaying the user interface (UI) of the app. It is typically implemented as a set of UI elements, such as buttons, text fields, and labels, and it is responsible for rendering the UI and handling user interactions.
Controller: The controller is responsible for mediating between the model and the view. It receives user input from the view and communicates it to the model, and it also updates the view based on changes in the model.
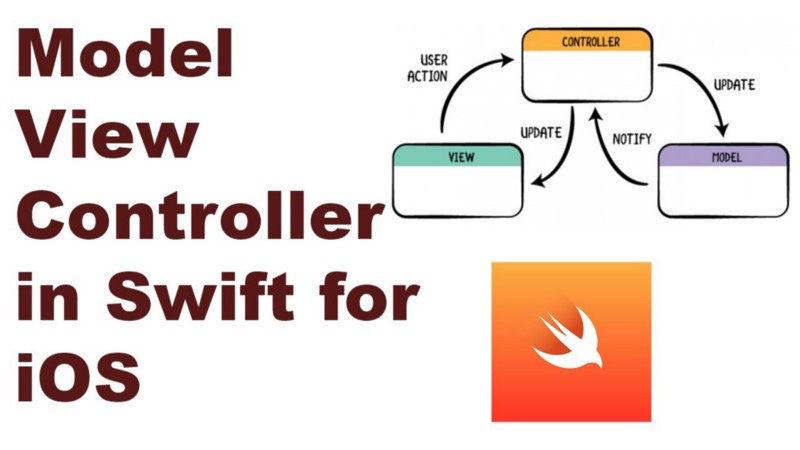
In an iOS app, the MVC design pattern is implemented using the iOS SDK and the Cocoa Touch framework. The model is typically implemented using classes and data structures, the view is implemented using UIKit and Core Graphics classes, and the controller is implemented using view controllers and other controller classes.
Overall, the MVC design pattern is an important tool for organizing the structure of an iOS app and for separating the different responsibilities of the app into distinct components. It can help make the app more modular and easier to develop, maintain, and test.
2. How do you handle memory management in iOS?
Memory management is an important aspect of iOS development, as iOS devices have limited amounts of memory and it is important to ensure that apps use memory efficiently to avoid performance issues and crashes. Here are a few strategies for handling memory management in iOS:
Use weak references: When you need to create a reference to an object, you should use a weak reference instead of a strong reference whenever possible. A weak reference does not keep the object alive, so it will be deallocated if it is no longer needed. This can help prevent memory leaks and improve the efficiency of your app.
Use ARC (Automatic Reference Counting): iOS uses ARC to automatically manage the memory of objects. ARC tracks the references to an object and releases the object when it is no longer needed. You can use ARC to simplify your memory management code and avoid common memory management errors.
Use instruments: The Xcode development environment includes a number of instruments that you can use to analyze the performance of your app, including the Memory and Allocations instruments. These tools can help you identify and fix memory-related issues in your app.
Use object pools: If you need to create and destroy a large number of objects, you can use an object pool to reuse objects instead of creating new ones. This can help improve the performance of your app by reducing the number of objects that need to be created and destroyed.
Overall, handling memory management in iOS requires a combination of careful coding practices and the use of tools and techniques such as weak references, ARC, and instruments. By following best practices and using these tools, you can build an iOS app that uses memory efficiently and avoids performance issues.
3. What is a delegate and when is it used?
In iOS development, a delegate is a design pattern that is used to allow one object to communicate with another object. A delegate is an object that acts on behalf of, or in coordination with, another object when that object is unable to perform a task itself.
Delegates are commonly used in iOS development to enable communication between different parts of an app. For example, a view controller might use a delegate to communicate with a model object or a custom view.
Here are a few key points about delegates in iOS development:
A delegate is a protocol: A delegate is implemented as a protocol in iOS, which defines a set of methods that the delegate object must implement. The protocol specifies the messages that the delegate can receive and the arguments that the delegate can accept.
A delegate is used to send messages: The object that uses a delegate sends messages to the delegate using the methods defined in the protocol. The delegate can then respond to these messages by performing some action or returning a value.
A delegate is used to customize behavior: Delegates are often used to allow an object to customize its behavior or to provide additional functionality. For example, a view controller might use a delegate to customize the behavior of a table view or to provide additional functionality for a custom view.
Overall, delegates are an important tool in iOS development, and they are widely used to enable communication and customization in iOS apps.
4. Can you explain the difference between a framework and a library?
In iOS development, frameworks and libraries are both code libraries that provide pre-written code that can be used in an app. However, there are some key differences between frameworks and libraries:
Frameworks: A framework is a collection of code and resources that define a layer of abstraction. Frameworks provide a higher level of abstraction than libraries and are typically more integrated with the operating system and other frameworks. Frameworks often include both code and resources, and they may include header files, images, and other resources in addition to code.
Libraries: A library is a collection of code that can be linked into an app. Libraries are typically more focused on providing a specific set of functionality and are not as integrated with the operating system and other frameworks. Libraries are typically implemented as a set of source code files that can be compiled and linked into an app.
Here are a few key differences between frameworks and libraries:
Integration: Frameworks are more integrated with the operating system and other frameworks, while libraries are more standalone and focused on providing a specific set of functionality.
Abstraction level: Frameworks provide a higher level of abstraction than libraries, making them easier to use but less flexible. Libraries are more flexible but may require more coding to use.
Code and resources: Frameworks often include both code and resources, while libraries are typically just code.
Overall, frameworks and libraries are both useful tools in iOS development, and they can be used to provide pre-written code and functionality to an app. The choice between a framework and a library will depend on the specific needs of the app and the level of integration and abstraction that is required.
Here is an example of a scenario where you might choose between a framework and a library:
You are building an iOS app that needs to access the user’s contacts list.
One option is to use the Address Book framework, which provides a set of APIs and classes for working with the user’s contacts. The Address Book framework is a framework, as it provides a common structure and set of functionality for accessing and manipulating the user’s contacts.
Another option is to use a third-party library, such as Contacts or ContactsUI, which also provide APIs and classes for working with the user’s contacts. These libraries are libraries, as they provide a specific set of functionality that can be used by an application to perform a specific task or set of tasks.
In this example, you might choose to use the Address Book framework if you want to use the standard iOS APIs for working with the user’s contacts, or you might choose to use a third-party library if you want more advanced features or customization options. The choice between a framework and a library will depend on the specific needs and requirements of your app.
5. How do you handle networking in iOS applications?
Networking is a common feature in iOS applications, and it allows apps to communicate with servers, send and receive data, and access web services. There are a few key strategies for handling networking in iOS applications:
Use the iOS networking APIs: iOS provides a number of APIs for handling networking tasks, including the URLSession API and the Network framework. These APIs provide a high-level interface for performing common networking tasks such as making HTTP requests, uploading and downloading data, and handling responses.
Use a networking library: There are a number of networking libraries available for iOS development that can simplify the process of handling networking tasks. These libraries often provide a more streamlined interface for performing common networking tasks and may include additional features such as automatic retry and error handling.
Implement error handling: Networking can be unpredictable, and it is important to handle errors and failures gracefully in your app. You should implement error handling in your networking code to handle network failures, timeouts, and other error conditions.
Use caching and offline support: To improve the performance and reliability of your app, you may want to implement caching and offline support. This can allow your app to continue functioning even when the network is unavailable or slow, and it can also improve the performance of your app by reducing the number of network requests that need to be made.
Overall, handling networking in iOS applications requires a combination of using the iOS networking APIs and implementing best practices such as error handling and caching. By following these strategies, you can build an iOS app that communicates effectively with servers and web services.
6. What is Auto Layout and how do you use it to create responsive user interfaces?
Auto Layout is a layout system that is used in iOS to create responsive user interfaces. It allows you to define the layout of your UI in a flexible and dynamic way, using a set of constraints that describe the relationships between the different UI elements in your app.
Auto Layout works by solving a set of constraints that you define to determine the layout of your UI. You can use Auto Layout to specify the size, position, and alignment of UI elements, and the system will automatically adjust the layout of your UI based on the constraints that you have defined.
To use Auto Layout to create responsive user interfaces in iOS, you can follow these steps:
Define your UI elements: First, you will need to define the UI elements that you want to include in your layout. This might include buttons, labels, text fields, and other UI elements.
Add constraints to your UI elements: Next, you will need to add constraints to your UI elements to define their layout. Constraints can be used to specify the size, position, and alignment of UI elements, and you can use them to create responsive layouts that adjust to different screen sizes and orientations.
Test your layout: After you have added constraints to your UI elements, you should test your layout to ensure that it looks and behaves as expected. You can use the iOS Simulator or a physical device to test your layout and make any necessary adjustments.
Overall, Auto Layout is an important tool for creating responsive user interfaces in iOS. By using Auto Layout and defining a set of constraints for your UI elements, you can build an app that looks and behaves consistently across different screen sizes and orientations.
7. Can you explain the difference between synchronous and asynchronous tasks?
In iOS development, asynchronous tasks are tasks that are performed in the background, while synchronous tasks are tasks that are performed in the foreground. Asynchronous tasks allow you to perform long-running tasks or tasks that involve waiting for a response from a server without blocking the main thread or the user interface of your app. Synchronous tasks, on the other hand, are performed in the foreground and can block the main thread or the user interface of your app.
Here are a few key differences between synchronous and asynchronous tasks:
Execution: Synchronous tasks are executed on the main thread, while asynchronous tasks are executed on a separate thread or queue.
Blocking: Synchronous tasks can block the main thread or the user interface of your app, while asynchronous tasks do not block the main thread or the user interface.
Performance: Asynchronous tasks can improve the performance of your app by allowing long-running tasks or tasks that involve waiting to be performed in the background. Synchronous tasks, on the other hand, can negatively impact the performance of your app by blocking the main thread.
Overall, synchronous and asynchronous tasks are both useful tools in iOS development, and the choice between the two will depend on the specific needs of your app. In general, asynchronous tasks are preferred for long-running tasks or tasks that involve waiting, while synchronous tasks are better suited for short-running tasks that do not involve waiting.
8. How do you handle data persistence in iOS applications?
Data persistence is the ability of an app to store data locally so that it can be accessed even when the app is not running. There are a few different strategies for handling data persistence in iOS applications:
Use property lists: Property lists are a simple and lightweight way to store structured data in iOS. You can use property lists to store arrays, dictionaries, strings, and other simple data types. Property lists are stored as files, and you can use the NSArray and NSDictionary classes to read and write property lists in your app.
Use Core Data: Core Data is a powerful framework for storing and managing data in iOS. It provides an object-oriented interface for working with data and includes features such as change tracking, undo support, and validation. Core Data is a good choice for apps that need to store large amounts of structured data or that need advanced features such as change tracking.
Use SQLite: SQLite is a lightweight, embedded database that is widely used in iOS apps. You can use SQLite to store and retrieve data in a structured way, and it is a good choice for apps that need to store large amounts of structured data or that need to perform complex queries.
Use user defaults: The NSUserDefaults class provides a simple way to store small amounts of data in iOS. You can use user defaults to store simple data types such as strings, numbers, and booleans, and it is a good choice for storing small amounts of data that need to be accessed frequently.
Overall, there are a number of different strategies for handling data persistence in iOS applications, and the best choice will depend on the specific needs of your app. You may want to use a combination of different strategies to store and manage data in your app.
9. Can you explain the difference between weak and strong references in Swift?
In Swift, a reference is a way to refer to an object in memory. There are two types of references in Swift: strong references and weak references.
A strong reference is a reference that keeps the object alive as long as the reference exists. When you create a strong reference to an object, the object will remain in memory as long as there is at least one strong reference to it.
A weak reference, on the other hand, is a reference that does not keep the object alive. When you create a weak reference to an object, the object will be deallocated if there are no other strong references to it. Weak references are often used to break reference cycles, which can cause memory leaks.
Here are a few key differences between strong and weak references in Swift:
Ownership: Strong references indicate ownership of an object, while weak references do not.
Memory management: Strong references keep an object alive, while weak references do not.
Reference cycles: Weak references can be used to break reference cycles, which can cause memory leaks.
Overall, strong and weak references are both important tools in Swift, and the choice between the two will depend on the specific needs of your app. Strong references are typically used to indicate ownership of an object, while weak references are used to break reference cycles and avoid memory leaks.
10. How do you handle error handling in iOS applications?
Error handling is an important aspect of iOS development, and it is necessary to handle errors and failures gracefully in your app. There are a few key strategies for handling error handling in iOS applications:
Use the built-in error handling mechanisms: iOS provides a number of built-in error handling mechanisms, including the try/catch statement and the do/try/catch block. You can use these mechanisms to handle errors and exceptions that are thrown by your code.
Define your own error types: You can define your own error types in Swift to handle custom error conditions in your app. Defining your own error types allows you to provide more specific error handling for your app and can make it easier to understand and debug errors.
Use error handling best practices: There are a number of best practices for error handling in iOS, including using descriptive error messages, logging errors, and handling errors at the appropriate level of abstraction.
Test your error handling code: It is important to test your error handling code to ensure that it is working as expected and that your app can handle errors and failures gracefully. You can use the XCTest framework or other testing tools to test your error handling code.
Overall, handling error handling in iOS applications requires a combination of using the built-in error handling mechanisms, defining your own error types, and following best practices for error handling. By following these strategies, you can build an iOS app that handles errors and failures gracefully and provides a high-quality user experience.
11. Can you explain the difference between a push and a modal segue in iOS?
In iOS, a segue is a transition between two view controllers. There are two types of segues: push segues and modal segues.
A push segue is a segue that pushes a new view controller onto the navigation stack. Push segues are typically used to navigate between view controllers in a hierarchical app, and they are triggered by tapping a table cell or a button. When a push segue is performed, the new view controller is pushed onto the navigation stack, and the user can navigate back to the previous view controller by tapping the back button in the navigation bar.
A modal segue is a segue that presents a new view controller modally. Modal segues are typically used to present a view controller that requires the user to take some action, such as entering their login credentials or selecting an item from a list. Modal segues are triggered by tapping a button or a gesture, and they are typically dismissed by tapping a done button or a cancel button.
Here are a few key differences between push segues and modal segues:
Navigation: Push segues are used to navigate between view controllers in a hierarchical app, while modal segues are used to present a view controller modally.
Transition style: Push segues use a slide-in transition style, while modal segues can use a variety of transition styles, such as fade, flip, or cover vertical.
Dismissal: Push segues are dismissed by tapping the back button in the navigation bar, while modal segues are typically dismissed by tapping a done or cancel button.
Overall, push segues and modal segues are both useful tools for navigating between view controllers in iOS, and the choice between the two will depend on the specific needs of your app. Push segues are typically used to navigate between view controllers in a hierarchical app, while modal segues are used to present a view controller modally.
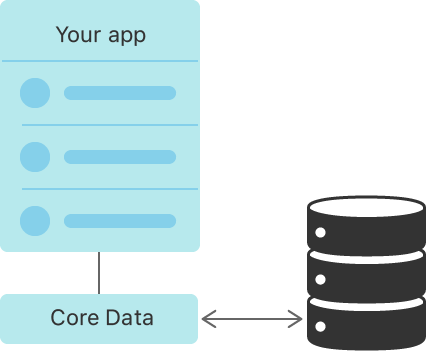
12. What is Core Data and how is it used to persist data in an iOS application?
Core Data is a framework for storing and managing data in iOS. It provides an object-oriented interface for working with data and includes features such as change tracking, undo support, and validation. Core Data is a good choice for apps that need to store large amounts of structured data or that need advanced features such as change tracking.
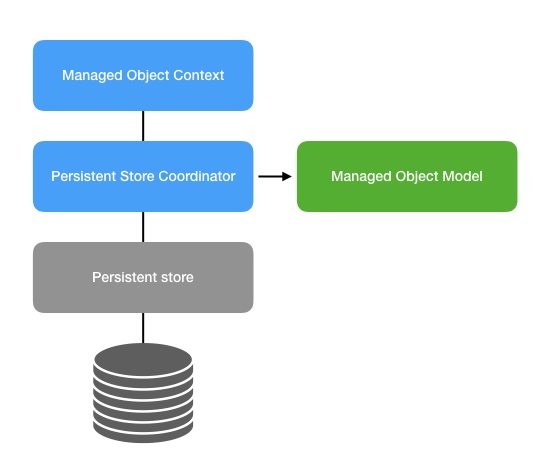
To use Core Data to persist data in an iOS application, you can follow these steps:
Set up the Core Data stack: The Core Data stack consists of a managed object model, a persistent store coordinator, and one or more managed object contexts. You will need to set up the Core Data stack in your app before you can start using Core Data.
Define your data model: You will need to define your data model using the managed object model. A managed object model consists of entities, which represent the objects that you want to store, and attributes, which represent the properties of those objects.
Create and fetch managed objects: You can use Core Data to create and fetch managed objects, which are representations of your data model objects. Managed objects are created and fetched using managed object contexts, and you can use them to access and modify the data in your Core Data store.
Save and retrieve data: You can use the managed object context to save and retrieve data from the Core Data store. When you save data, the changes are persisted to the persistent store coordinator, and when you retrieve data, the managed object context fetches the data from the persistent store coordinator.
13. Can you explain the difference between a static and a dynamic library in iOS?
In iOS, a library is a collection of precompiled code that can be used by an app to perform a specific task. There are two types of libraries in iOS: static libraries and dynamic libraries.
A static library is a library that is linked to the app at build time. When you include a static library in your app, the code from the library is copied into the app binary, and the app becomes dependent on the library. Static libraries are useful when you need to include a large amount of code in your app, or when you want to distribute a library as part of your app.
A dynamic library is a library that is loaded into the app at runtime. When you include a dynamic library in your app, the code from the library is not copied into the app binary. Instead, the app loads the library from a separate file at runtime. Dynamic libraries are useful when you want to distribute a library separately from your app, or when you want to update a library without having to update the app.
Here are a few key differences between static libraries and dynamic libraries in iOS:
Linking: Static libraries are linked to the app at build time, while dynamic libraries are loaded into the app at runtime.
Size: Static libraries increase the size of the app binary, while dynamic libraries are stored in separate files and do not increase the size of the app binary.
Distribution: Static libraries are distributed as part of the app, while dynamic libraries can be distributed separately from the app.
Overall, static libraries and dynamic libraries are both useful tools in iOS development, and the choice between the two will depend on the specific needs of your app. Static libraries are useful when you need to include a large amount of code in your app or when you want to distribute a library as part of your app, while dynamic libraries are useful when you want to distribute a library separately from your app or when you want to update a library without updating the app.
14. What is Grand Central Dispatch (GCD) and how is it used in iOS development?
Grand Central Dispatch (GCD) is a technology for managing concurrent tasks in iOS. It provides a set of APIs for managing and executing tasks concurrently, and it is used to improve the performance and responsiveness of iOS apps.
GCD uses a dispatch queue to manage tasks. A dispatch queue is a data structure that stores tasks and executes them in the order that they are added. There are two types of dispatch queues: serial and concurrent.
A serial dispatch queue executes tasks one at a time, in the order that they are added. A concurrent dispatch queue executes tasks concurrently, and it is able to execute multiple tasks at the same time.
To use GCD in iOS development, you can follow these steps:
Create a dispatch queue: You can create a dispatch queue using the dispatch_queue_create function. You can specify the type of queue (serial or concurrent) and a name for the queue when you create it.
Add tasks to the queue: You can add tasks to a dispatch queue using the dispatch_async function. Tasks are added to the queue as blocks of code, and they are executed in the order that they are added.
Execute tasks: GCD executes tasks in the dispatch queue according to the type of queue. Tasks in a serial queue are executed one at a time, while tasks in a concurrent queue are executed concurrently.
Overall, GCD is a powerful tool for managing concurrent tasks in iOS. By using GCD and creating dispatch queues, you can improve the performance and responsiveness of your iOS app by executing tasks concurrently.
15. How do you handle user input validation in iOS applications?
User input validation is an important aspect of iOS development, as it ensures that the data entered by the user is valid and meets the requirements of the app. There are a few key strategies for handling user input validation in iOS applications:
Use built-in validation methods: iOS provides a number of built-in methods for validating user input, such as the NSRegularExpression class and the NSDataDetector class. You can use these methods to validate user input and ensure that it meets the requirements of your app.
Implement custom validation logic: If the built-in validation methods do not meet the needs of your app, you can implement your own custom validation logic. This may involve defining your own validation rules or using regular expressions to validate user input.
Use validation libraries: There are a number of libraries and frameworks available for user input validation in iOS, such as Validator and FormValidatorSwift. These libraries can provide a range of validation functionality and can make it easier to implement user input validation in your app.
Test your validation code: It is important to test your validation code to ensure that it is working as expected and that it is able to validate user input correctly. You can use the XCTest framework or other testing tools to test your validation code.
Overall, handling user input validation in iOS applications requires a combination of using built-in validation methods, implementing custom validation logic, and testing your validation code. By following these strategies, you can build an iOS app that ensures that user input is valid and meets the requirements of your app.
16. Can you explain the difference between a UITableView and a UICollectionView in iOS?
UITableView and UICollectionView are two UI components that are used to display data in a structured, scrollable format in iOS. Both components are used to display large amounts of data and support data binding, and they both use a data source and a delegate to manage the data and the display of the data.

Here are a few key differences between UITableView and UICollectionView:
Layout: UITableView displays data in a vertical list, while UICollectionView displays data in a grid or a custom layout.
Cells: UITableView uses UITableViewCell objects to display data, while UICollectionView uses UICollectionViewCell objects.
Selection: UITableView supports single selection and multiple selection, while UICollectionView only supports single selection.
Editing: UITableView supports inserting, deleting, and moving rows, while UICollectionView does not support these features.
Overall, UITableView and UICollectionView are both useful tools for displaying data in iOS, and the choice between the two will depend on the specific needs of your app. UITableView is well-suited for displaying data in a vertical list, while UICollectionView is well-suited for displaying data in a grid or a custom layout.
17. How do you implement security in an iOS application?
Implementing security in an iOS application is important to protect sensitive data and ensure that the app is secure. There are a few key strategies for implementing security in an iOS application:
Use secure coding practices: Secure coding practices involve writing code that is resistant to common security vulnerabilities, such as buffer overflows, cross-site scripting (XSS), and injection attacks. You can use tools such as static analysis and dynamic analysis to detect and prevent security vulnerabilities in your code.
Encrypt sensitive data: You can use encryption to protect sensitive data in your app, such as passwords, credit card numbers, and personal information. You can use the built-in encryption features of iOS, such as the Keychain and the Secure Enclave, to encrypt sensitive data.
Implement authentication and authorization: You can use authentication and authorization to control access to sensitive data and resources in your app. Authentication involves verifying the identity of a user, while authorization involves granting or denying access to resources based on the user’s permissions.
Use secure communication: You can use secure communication protocols, such as HTTPS and SSL/TLS, to protect data transmitted between your app and a server. This can help prevent eavesdropping and data tampering.
Test and deploy securely: It is important to test your app for security vulnerabilities and to deploy it securely. You can use tools such as penetration testing and code signing to test and deploy your app securely.
Overall, implementing security in an iOS application requires a combination of secure coding practices, encryption, authentication and authorization, secure communication, and testing and deployment. By following these strategies, you can build a secure iOS app that protects sensitive data and resources.
18. Can you explain the difference between a nib and a storyboard in iOS?
A nib (short for “neat interface builder”) and a storyboard are two ways to design the user interface (UI) of an iOS app. Both nibs and storyboards allow you to create and design the UI of your app using a visual interface builder, and both are used to define the layout and appearance of the app’s views and view controllers.
Here are a few key differences between nibs and storyboards:
File format: Nibs are stored in separate files, while storyboards are stored in a single file.
Size and complexity: Nibs are typically smaller and simpler than storyboards, as they contain only a single view or view controller. Storyboards can contain multiple views and view controllers and can be more complex.
Reusability: Nibs can be reused in multiple places in an app, while storyboards are typically used to define the flow and layout of an entire app or a specific section of an app.
Localization: Nibs are easier to localize than storyboards, as they are stored in separate files and can be translated independently.
Overall, nibs and storyboards are both useful tools for designing the UI of an iOS app, and the choice between the two will depend on the specific needs of your app. Nibs are well-suited for smaller, simpler UIs, while storyboards are well-suited for larger, more complex UIs and for defining the flow and layout of an entire app or a specific section of an app.
19. How do you handle localization in an iOS application?
Localization is the process of adapting an app to different languages and regions. Handling localization in an iOS app involves designing and developing the app in a way that makes it easy to translate and adapt to different languages and regions.
Here are a few key strategies for handling localization in an iOS application:
Use internationalization APIs: iOS provides a number of APIs and frameworks for internationalization, such as the NSBundle class and the NSLocalizedString function. These APIs allow you to separate translatable text from your code and to load the appropriate translations at runtime.
Use XLIFF files: XLIFF (XML Localization Interchange File Format) files are used to store translations for an app. You can use XLIFF files to store translations for different languages and regions, and you can use tools such as the genstrings and ibtool commands to generate and import XLIFF files.
Test and debug localization: It is important to test and debug your app’s localization to ensure that it is working as expected and that all translations are displayed correctly. You can use the iOS Simulator and the NSLocale class to test and debug localization in your app.
Update and maintain translations: As you update and maintain your app, you may need to update or add translations for new or modified text. You can use tools such as the ibtool command to update and maintain translations in your app.
Overall, handling localization in an iOS application involves using internationalization APIs, XLIFF files, testing and debugging, and updating and maintaining translations. By following these strategies, you can build an iOS app that is easy to translate and adapt to different languages and regions.
20. Can you explain the difference between a push notification and a local notification in iOS?
Push notifications and local notifications are two types of notifications that can be used in iOS apps to alert the user of events or updates.
Here are a few key differences between push notifications and local notifications:
Source: Push notifications are sent by a server to the device, while local notifications are scheduled and triggered by the app itself.
Internet connection: Push notifications require an internet connection to be delivered, while local notifications do not require an internet connection.
Customization: Push notifications have limited customization options, as they are sent by the server and cannot be modified by the app. Local notifications have more customization options, as they are triggered and controlled by the app.
Delivery: Push notifications are delivered to the device regardless of whether the app is in the foreground, background, or not running. Local notifications are delivered to the device only if the app is in the foreground or background.
Overall, push notifications and local notifications are both useful tools for alerting the user of events or updates in an iOS app. Push notifications are well-suited for sending updates or alerts from a server, while local notifications are well-suited for triggering and scheduling events or updates within the app itself.
21. How do you integrate third-party libraries in an iOS application?
Integrating third-party libraries into an iOS application can be a useful way to add functionality or features to your app. Here are a few key steps for integrating third-party libraries into an iOS application:
Find and select a library: There are a number of third-party libraries available for iOS development, and you can use search engines, package managers, or online repositories to find and select a library that meets your needs.
Install the library: Once you have selected a library, you will need to install it in your app. This may involve using a package manager, such as CocoaPods or Carthage, to install the library and its dependencies.
Import the library: After installing the library, you will need to import it into your app. This typically involves adding an import statement to the top of your source files.
Configure the library: Some libraries may require additional configuration, such as setting up API keys or providing additional dependencies. You will need to follow the instructions provided by the library to complete the configuration process.
Use the library: Once you have installed and configured the library, you can use it in your app by calling its functions or methods and using its classes and data types.
Overall, integrating third-party libraries into an iOS application involves finding and selecting a library, installing and importing the library, and configuring and using the library in your app. By following these steps, you can add functionality and features to your app by integrating third-party libraries.
22. Can you explain the difference between a synchronous and an asynchronous network request in iOS?
A synchronous network request is a type of network request in which the app waits for a response from the server before continuing, while an asynchronous network request is a type of network request in which the app can continue to run while waiting for a response from the server.
Here are a few key differences between synchronous and asynchronous network requests:
Execution: Synchronous network requests block the app’s main thread until a response is received, while asynchronous network requests do not block the main thread and allow the app to continue running while waiting for a response.
Performance: Synchronous network requests can slow down the app’s performance, as they block the main thread and prevent other tasks from being performed. Asynchronous network requests do not block the main thread and can improve the app’s performance.
User experience: Synchronous network requests can cause delays in the app’s UI, as the app is blocked until a response is received. Asynchronous network requests do not cause delays in the UI and can provide a better user experience.
Overall, synchronous and asynchronous network requests are two different approaches to handling network requests in an iOS app. Synchronous network requests are suitable for simple, short-lived requests, while asynchronous network requests are better suited for longer or more complex requests. The choice between the two will depend on the specific needs of your app.
23. How do you optimize the performance of an iOS application?
Optimizing the performance of an iOS application is important to ensure that the app runs smoothly and efficiently. Here are a few key strategies for optimizing the performance of an iOS application:
Use performance tools: iOS provides a number of tools and frameworks for measuring and improving performance, such as Instruments, Time Profiler, and the Accelerate framework. You can use these tools to identify and fix performance issues in your app.
Optimize memory usage: Memory is a limited resource on mobile devices, and it is important to optimize your app’s memory usage to ensure that it does not consume too much memory and cause performance issues. You can use tools such as the Memory Monitor to identify and fix memory usage issues in your app.
Minimize power consumption: Mobile devices rely on batteries, and it is important to minimize your app’s power consumption to ensure that it does not drain the battery too quickly. You can use tools such as the Energy Gauge and the Energy Diagnostics framework to measure and optimize your app’s power consumption.
Use efficient algorithms and data structures: Choosing the right algorithms and data structures can have a big impact on your app’s performance. You can use tools such as the Time Profiler to identify and optimize the performance of your app’s algorithms and data structures.
Optimize your app’s UI: The performance of your app’s UI can have a big impact on the user experience. You can use techniques such as view hierarchy optimization and offloading heavy work to a background queue to improve the performance of your app’s UI.
Overall, optimizing the performance of an iOS application involves using performance tools, optimizing memory usage, minimizing power consumption, using efficient algorithms and data structures, and optimizing your app’s UI. By following these strategies, you can build an iOS app that runs smoothly and efficiently.
24. Can you explain the difference between a delegate and a data source in iOS?
In iOS development, a delegate and a data source are two patterns that are often used to manage the flow of data between objects in an app.
Here are a few key differences between a delegate and a data source:
Role: A delegate is an object that acts on behalf of another object, while a data source is an object that provides data to another object.
Responsibilities: A delegate is responsible for handling events or tasks that are triggered by the object it represents, while a data source is responsible for providing data to the object that it serves.
Protocols: Delegates and data sources are typically implemented using protocols in iOS. A protocol defines a set of methods or properties that an object must implement to fulfill a particular role.
Overall, a delegate and a data source are two patterns that are used to manage the flow of data between objects in an iOS app. A delegate handles events or tasks that are triggered by an object, while a data source provides data to an object. Both patterns are implemented using protocols and are used to manage the flow of data between objects in an iOS app.
25. How do you handle in-app purchases in an iOS application?
In-app purchases are a way for users to buy additional content or features from within an iOS app. Here are a few key steps for handling in-app purchases in an iOS application:
Set up in-app purchases in App Store Connect: In order to enable in-app purchases in your app, you will need to set up your app in App Store Connect and create in-app purchase products for the content or features that you want to sell.
Integrate the StoreKit framework: The StoreKit framework provides the APIs and classes that you will need to handle in-app purchases in your app. You will need to import the framework and use its classes to request payment and track the status of in-app purchases.
Request payment: To request payment for an in-app purchase, you will need to use the SKPaymentQueue class to add a payment request to the payment queue. You will also need to implement the SKPaymentTransactionObserver protocol to handle the payment transaction and track the status of the purchase.
Provide the purchased content or feature: Once a payment has been completed, you will need to provide the purchased content or feature to the user. This may involve downloading the content from a server or unlocking a feature within the app.
Restore purchases: You will also need to implement a way for users to restore their previous purchases, in case they need to re-install the app or switch to a new device. You can use the SKPaymentQueue class to restore previous purchases.
Overall, handling in-app purchases in an iOS application involves setting up in-app purchases in App Store Connect, integrating the StoreKit framework, requesting payment, providing the purchased content or feature, and restoring purchases. By following these steps, you can enable in-app purchases in your iOS app and sell additional content or features to users.